
AI for Digital Products in 2025
While AI has certainly made leaps and bounds in the past few years, we've barely scratched the surface of its potential. In 2025, that will change
Whilst Azure DevOps provides out of the box, easy to use tools to help with automatic building and releasing for iOS, it can be a little more challenging if your pipelines require patching of builds for different environments and build types.
Automatically building and releasing a typical iOS app, composed of a single application with perhaps cocoapods or swift packages is straightforward enough. A build pipeline will simply archive and produce an IPA package which will then be subsequently used as an artifact when releasing a build through some distribution channel like App Centre or Test Flight.
However, what if, for example, we wanted to release a production app with a bundle identifier of “com.company.app” and a UAT app with a bundle identifier “com.company.app-uat”? We need to have the flexibility to produce multiple IPAs from our source code.
On top of this, what if we wanted to build and release apps with extensions, such as an Apple Watch app or an iOS only app with widgets? Not only would we need the ability to build and release multiple IPAs, but we’d also need the ability to sign the apps with multiple provisioning profile / certificate combinations since extensions require different bundle IDs to their parent app.
Let’s deal with the original problem of building and releasing variations of the same application to support different bundle IDs. Generally speaking, we have two options:
We could have a build pipeline which produces multiple IPAs, one for production and one for UAT using variables to assign the correct Xcode scheme / configuration for the build process. These configurations will have a configuration-based variable for the bundle ID so that we can have our separate builds for production and UAT. A release pipeline, containing two deployments would then take each artifact and release them through the appropriate distribution channel.
Alternatively, a build pipeline could archive and export a single IPA to an artifact, and then via the release pipeline, patch the IPA across two deployments ensuring that the appropriate bundle ID is assigned to each build. Finally, we can resign the IPAs and deploy them to their respective destinations.
For more details on how to achieve this, see our previous article.

In this technical deep dive, we discuss how to create a ‘build once, release many’ pipeline for a mobile app using Azure DevOps.
Shout Digital. Build what the future needs. Digital products, web and mobile app development.
From experience, it can be considered best practice to utilise Apple’s tools as much as possible, since they are tried and tested to the extent we can rely on them. In other words, Xcode will build apps using configurations and schemes and correctly sign them for distribution. Having said that, we can dig a little deeper and use slightly ‘lower level’ tools, also provided by Apple, for a bit more flexibility to achieve what we’d like.
In order to ensure that iOS build with multiple plugins are produced with the correct provisioning profiles and certificates, we need to provide the pipeline with an 'ExportOptions.plist' file.
This can be obtained by exporting the app from Xcode manually, where you have the opportunity to provide the correct provisioning profiles and certificates for each application extension plus the main bundle.
The output of this export will produce an .ipa file, ExportOptions.plist and a few other files. Insepct the ExportOptions.plist and notice that for your application with multiple extensions, there will be an array of provisioning profiles mapped to their respective bundle ID. This will now instruct xcode build to use the correct resources when sigining in the future.
In the build pipeline, add 'clean' as an action and ensure 'build app package' is checked.
For the signing style, select ‘Do not code sign'.
Under Export options, select 'Plist' and specify your ExportOptions.plist from your project under Export options plist. (The file must have been included in version control before you can do this.)
Re-signing an ipa is simple enough with one target but when we start talking about an application which contains an extension or has a Watch app associated with it, it becomes crucial that we understand where the info.plist, provisioning profile and code signature for each of those targets are stored I order to re-sign the different targets.
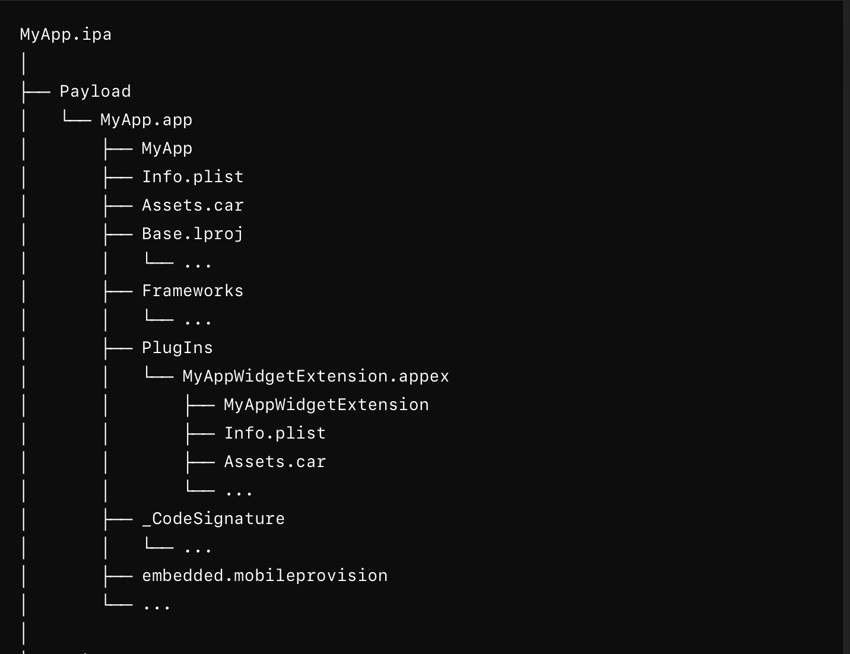
We know the .ipa itself can be explored by renaming the file extension from .ipa to .zip and unzipping the contents. Once we unzip the file, we see that there are 3 folders inside it: Payload, Signatures and Symbols. Inside the Payload directory (Figure 1) we find our application bundle, which is where we will be doing most of our work.
Inside the application bundle we find the _CodeSignature directory and embedded.mobileprovision for the main app and if we go to the Plugins folder, we'll find the appex file for the widget extension, which is another application bundle containing an Info.plist, _CodeSignature directory and embedded.mobileprovision. That’s everything we need to know about the folder structure of the ipa.
In order to re-sign the app we need to:
Update the Bundle identifiers in the info.plist for the main app and the extensions.
Replace the embedded.mobileprovision with new proviosning profile for app and the extensions.
Re-generate and replace the _CodeSignature directory and CodeResources files for the main app as well as all the extensions.
Let’s look at the devops tasks that we’ll use to achieve the re-signing of the app with a widget extension on the release pipeline.
As shown in Figure 2, these are the tasks that we’ll use to put our release stages together. Some of these tasks are already explained in https://www.shoutdigital.com/blog/how-to-speed-up-distribution-of-ios-builds, so we’ll be going into the details of the tasks relevant to re-signing the app and, in particular, its extensions.

Let’s go through them one at a time. We will of course assume that your release pipeline and stages are pointing at the correct artefact (produced by the build pipeline).
Install an Apple Certificate
The "Install Apple Certificate" task in Azure DevOps installs an Apple developer certificate on the build runner which is used to sign the application. We’re going to be deploying our app to the appstore so this needs to be a distribution certificate.
Install Provisioning profile
We’ll need to download the provisioning profiles for each target of your app in the example above. We’ve added two tasks; one for the application and the other one is for the Widget extension. These will be downloaded from your ‘Secure Files’ under the ‘Library’.
Unzip IPA
In order to explore and manipulate the contents of our .ipa, we need to unzip the file’s contents to a temporary location. This is a straightforward unzip command within the bash script which will handle this. Below is a sample script:
unzip "$(System.DefaultWorkingDirectory)/{artifact_name}/{path_to_ipa}/{filename}.ipa" -d "$(Agent.TempDirectory)/application_files"
Patch Config
We’ll use the ‘Patch JSON files’ task that Devops provides to update the config files for both app and the extension. For more information, check the Patch Config section of the article below.
In this technical deep dive, we discuss how to create a ‘build once, release many’ pipeline for a mobile app using Azure DevOps.
Shout Digital. Build what the future needs. Digital products, web and mobile app development.
Create App Entitlements
We’ll use the Bash script task to decode the contents of the provisioning profile we downloaded in step 2, extract the entitlements, and save it to a new file which we will then use in the re-signing step.
If you run the command security cms -D -i path/to/mobileprovision, you can see the contents of the provisioning profile and the entitlements keys, which can be extracted and saved to a separate file, which will be used later to re-sign the main app and the extensions. Check out the Create Entitlements section of https://www.shoutdigital.com/blog/how-to-speed-up-distribution-of-ios-builds .

Resign IPA
We now have everything we need to start the re-signing process. We’ll start with our widget extension first and then move onto the main app. First, we need to remove the old signature files, update the info.plist of the app and replace the embedded.mobileprovision with the new provisioning profile we installed in step 2.
We will start by removing the _CodeSignature directory which contains the old signature. It's the directory that contains the CodeResources file, which is a plist that holds the hashes of all the resource files, executable, frameworks and signature used to verify the integrity of the application. Don’t worry though, this directory will be generated again when we re-sign the app.
To remove the _CodeSignature directory we can use rm command. We’ll provide the path to the _CodeSignature folder in the widget app extension bundle.
rm -rf "$(Agent.TempDirectory)/application_files/Payload/{filename}.app/Plugins/WidgetExtension.appex/_CodeSignature"
Next, we’ll replace the existing provisioning profile with the new one. We can use the output variable name we specified in step 2 to easily access the path of provisioning profile by using WidgetProvisioningProfile.secureFilePath. We can use the cp command and provide this path as the source and path to the destination file. We’re going to name the destination file embedded.mobileprovision so that cp command can overwrite the file instead of removing it first and then copying it.
cp "$(WidgetProvisioningProfile.secureFilePath)" "$(Agent.TempDirectory)/application_files/Payload/{filename}.app /Plugins/WidgetExtension.appex/embedded.mobileprovision"
Before we move on to the code signing step, we also need to update the info.plist file with updated values e.g. Bundle Identifier. This is achieved by using the ‘plutil’ command. Here’s an example that updates the Bundle Identifier values in the info.plist.
plutil -replace CFBundleIdentifier -string "com.company.app.Widget" "$(Agent.TempDirectory)/application_files/Payload/{filename}.app/Plugins/WidgetExtension.appex/Info.plist"
All that’s left to do now is re-sign the app using the codesign tool which will to create, check, and display the resulting code signatures. Here’s what the full command looks like:
codesign -f
-s "$(AppleCertificate.signingIdentity)"
-i "com.company.app.Widget"
--entitlements "$(Agent.TempDirectory)/widget-entitlements.plist"
"$(Agent.TempDirectory)/application_files/Payload/{filename}.app/PlugIns/{filename}WidgetExtension.appex"
Let’s go over the arguments passed in the command above and explain what each argument is doing:
–f flag that tells codesign to force the resigning of the app even if it has already been signed.
-s flag is used to provide the signing identity. You can use security find-identity -v -p codesigning to find the signing identities on the system. It looks something like "iPhone Developer: Your Name (XXXXXXXXXX)". We can use the output variable name AppleCertificate.signingIdentity from step 1.
-i flag is used to provide the Bundle Identifier of the app. We have provided our Widget extension’s bundle identifier.
--entitlements flag specifies the path to the entitlements file. We have provided the path to the file generated in step 5.
The last parameter is the path to the app bundle (In this case Widget extension bundle).
When we run this command, if successful, it displays output that looks something like this:
/Payload/{filename}.app/PlugIns/{filename}WidgetExtension.appex: replacing existing signature
codesign -dv "$(Agent.TempDirectory)/application_files/Payload/{filename}.app/PlugIns/{filename}.appex"
Now that the extension is signed, we can move to re-signing the main app. The steps remain the same with the exception that we are targeting the main app bundle. The main app bundle also contains _CodeSignature, embedded.mobileprovision and info.plist. Let's start by removing the _CodeSignature directory:
rm -rf "$(Agent.TempDirectory)/application_files/{filename}.app/_CodeSignature"
After that, we can go ahead and replace the provisioning profile with the one we downloaded in Step 2.
cp "$(ProvisioningProfile.secureFilePath)" "$(Agent.TempDirectory)/application_files/{filename}.app/embedded.mobileprovision"
Then we patch any values we need to change in the info.plist e.g. bundle identifier, display name etc.
plutil -replace CFBundleIdentifier
-string "com.company.app"
"$(Agent.TempDirectory)/application_files/{filename}.app/Info.plist"
And finally, codesign the main app using the certificate from step 1 and the entitlements file we generated for the app this time round:
codesign -f
-s "$(AppleCertificate.signingIdentity)"
-i "com.company.app"
--entitlements "$(Agent.TempDirectory)/app-entitlements.plist"
"$(Agent.TempDirectory)/application_files/Payload/{filename}.app"
And to verify the signature we can pass the main app bundle’s path to code sign like this:
codesign -dv "$(Agent.TempDirectory)/application_files/Payload/{filename}.app"
Zip IPA
Next, we use an “Archive Files” task to zip back up the contents of our app. The key settings on this task is the location of the files to be zipped which in this case is:
$(Agent.TempDirectory)/application_files/
It is also important to note that the ‘Prepend root folder name to archive paths’ must be left unchecked. We don’t want the application_files included in the path because it is not part of the expected structure of the zip file. The final setting is the location of the output file. We can store it in our Temp Directory and also ensure that the file extension is .ipa. So something like:
$(Agent.TempDirectory)/{filename}.ipa
Publish to App Store
Finally, we add a task for uploading our resigned .ipa to App Store Connect. There isn’t a lot to cover here as it’s a straightforward task to add. We just need to ensure that we are pointing at out our resigned .ipa when specifying the ‘Binary Path’, and supply the task with the correct ‘Bundle ID’.
It's time to fire up the finished release pipeline with a correct build generated through Build Pipelines. To check if everything is done right, head over to the Logs section of the pipeline and check the following:
Patch config.json step for the main app and the extension to ensure correct values are patched.
Ensure that the entitlements files are correctly created.
Re-sign step has not thrown an error.
And last but not least, download the build from TestFlight to see if it launches and is pointing to the right Environment.
In summary, configuring Azure DevOps to handle the complexities of building and releasing multiple variations of an iOS application, especially when extensions like widgets or Apple Watch apps are involved, can be complex but entirely manageable.
You can achieve seamless deployments by following a well-structured approach, from setting up build pipelines that cater to different environments to managing provisioning profiles and re-signing tasks. The aim is to use the power of Apple's tools where possible, complemented by the flexibility of Azure DevOps tasks, to ensure your application is correctly configured, signed, and distributed.
By adhering to these guidelines, you can streamline your pipeline process and confidently release various builds to your target destinations, maintaining consistency and reliability across all app versions.
While AI has certainly made leaps and bounds in the past few years, we've barely scratched the surface of its potential. In 2025, that will change

... and what's more, we have been reliably informed that Shout are one of only ten organisations to be awarded the standard so far, and the first in our industry.

Show me that you know me—in a digital world full of endless choice and high expectation, personalisation is the key to retention and improved conversion.